How To Fix The Buttons On Your Remote Controls
If you’re like me, you have at least one irritating remote control with one or more unresponsive buttons, perhaps the one for a TV or stereo. Or maybe a remote for something else, like outdoor lighting, a security system, or a garage door opener. In my case, I have one Pioneer receiver remote with a frustrating volume control button that now ignores me no matter how hard or often I press the Up or Down buttons.
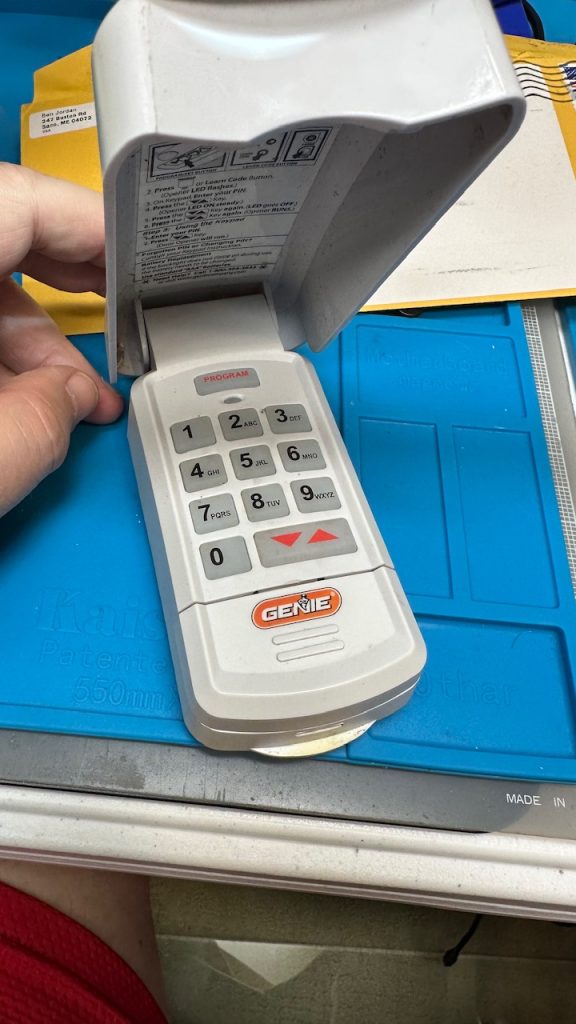
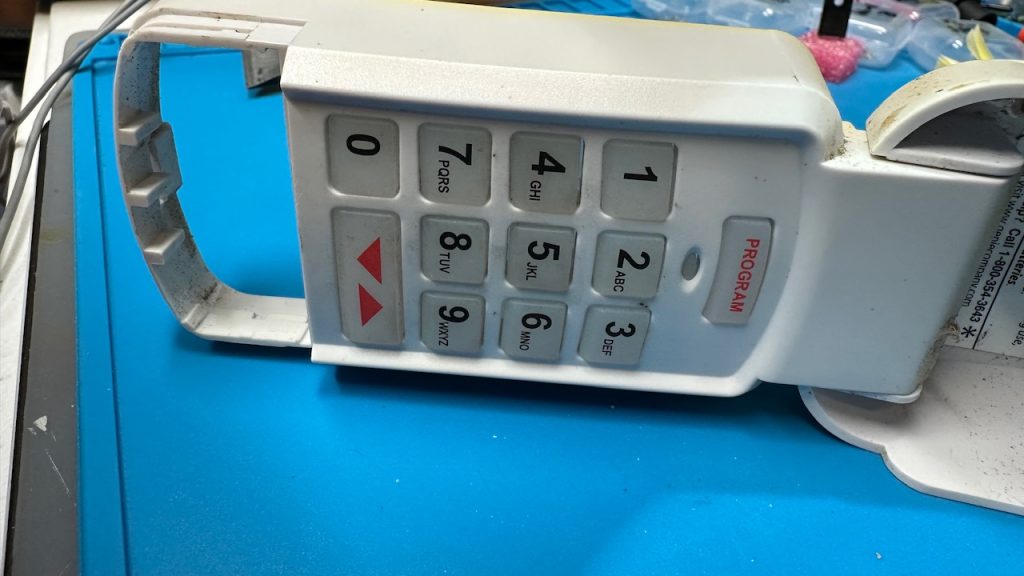
However, the remote control to my garage door is my highest priority right now. The Genie brand remote is important, and when I press the buttons, it is now completely unresponsive. I could buy a new remote for the garage door for around $35.00 (USD), but where’s the fun in that? Besides, why send it to the landfill if I can fix it? So, in order to satisfy my curiosity, I decided to open up the remote, figure out how it worked, why it failed, and, if practical, fix it. If I was successful (spoiler alert: I was), I thought I’d share how to fix the buttons on your remotes, if you have one, and explain why all remotes of this type fail eventually.
Why Do Remote Control Buttons Fail?
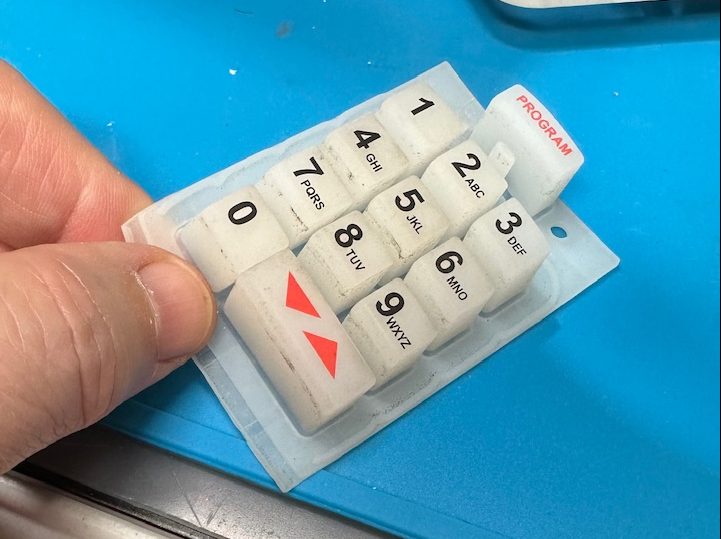
The simple answer to why one or more buttons fail on your stereo or TV remote is mostly due to age and repetitive use. Modern gadgets and consumer electronic remote controls use one of several different button interface technologies. However, the most commonly encountered IR (invisible light) or RF (radio wave) remote control uses a flexible silicone rubber-like keypad to communicate your wishes to your equipment. This silicone keypad is the most common interface for consumer electronic remotes, so that’s the type of remote I’m specifically discussing today.
Sadly, as with most things made these days, you tend to get what you pay for. Remotes are no different. But, even the highest quality remotes using flexible silicone rubber buttons will wear out or deteriorate. Cheaper ones, such as with kid’s toys or low-cost consumer electronics, are likely to fail much quicker. In any case, the failure mode is seldom instantaneous, but rather a slow and increasingly irritating lack of response on the most frequently used buttons. We almost always assume it’s the batteries. Sometimes, you just want to throw the darned things for failing you when you want the remote to work.
How Do The Remote Control Buttons Work?
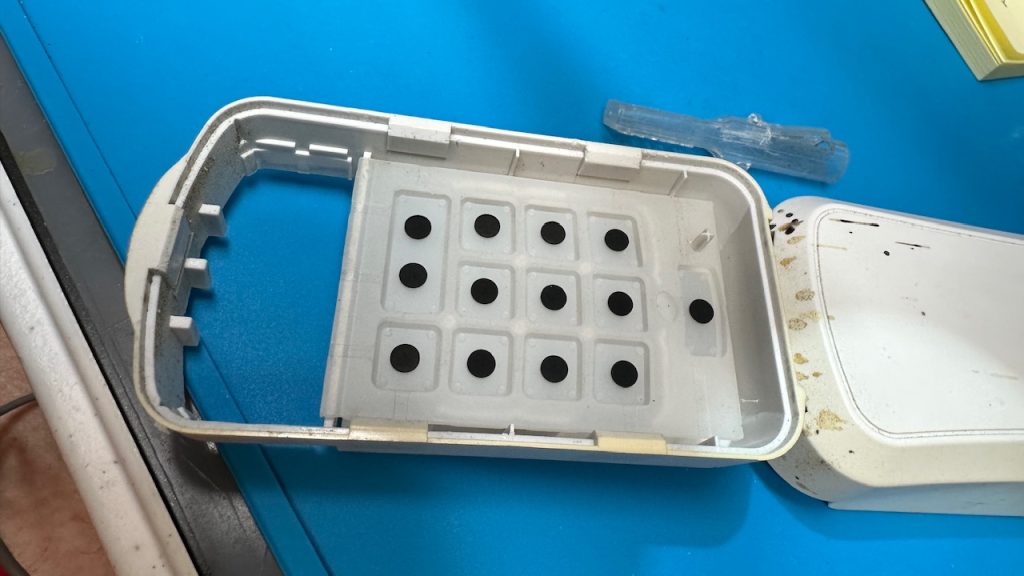
Assuming the silicone rubber “keypad” is supple, not cracked, torn, or damaged, the parts that fail are the little dark dots on the bottom of each of the flexible buttons. These are the contacts. Those dark spots are essentially conductive paint. A common material used as the contact is a conductive carbon graphite or similar material applied to each button.
Operation is simple: when you press the button, the small conductive contact presses down on the circuit board and joins or shortcircuits the corresponding copper traces, provoking a response from the remote. It’s cheap, effective, and sometimes robust in higher quality products.
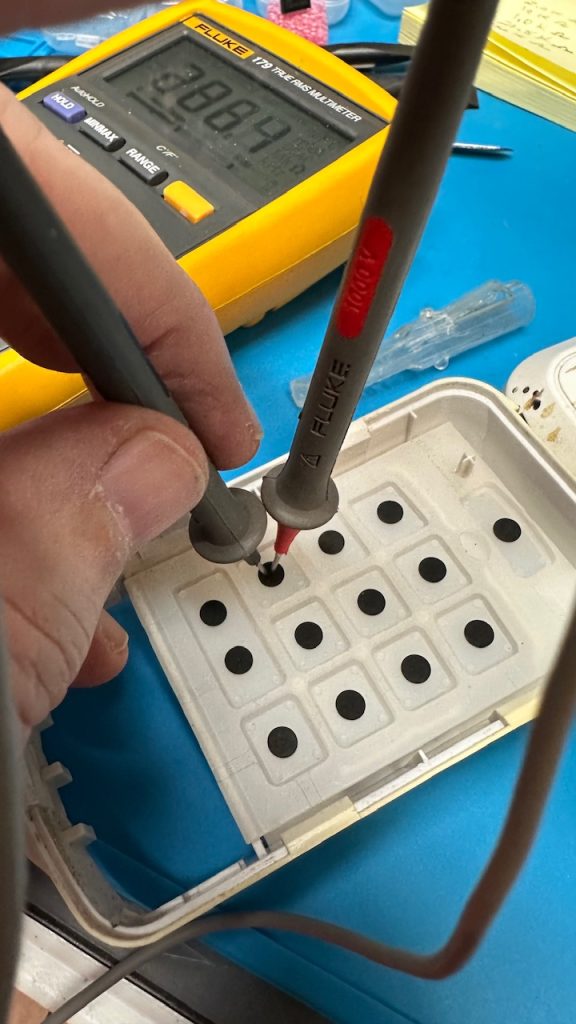
The specific contact failure mode is that it loses conductivity. One way to verify this is to use a multimeter to check the resistance of the contact pad. The resistance should ideally be less than 200 ohms, though may still function less efficiently as high as 400 ohms. Once the resistance measures above the 400-ohm mark, the contact is unable to function as a conductor effectively, if the button still functions at all. Think of the little dark contact as a small piece of electrical wire making a connection between two other wires, and you get the general idea.
Why Are Some Remote Control Buttons Not Working While Others Are Fine?
Barring trauma, heat, or liquid damage, the most frequently used buttons fail first. Repetitive regular use degrades the contact much quicker than the infrequently used buttons. It’s that simple. Sometimes, the conductive contacts crack or become dislodged from the silicone part, or the conductive material gradually wears down until there’s too little to function. The resistance rises to a point where the contact no longer activates the connection. At first, in the early stages of failure, it doesn’t occur to us that the button is failing. We likely try changing the batteries or recharging the unit. We simply don’t notice it until we realize we have to press a little harder until nothing happens. So, what can we do about our unresponsive remote?
Getting Inside The Remote Control
If you are very lucky, you will have a small screw or two to remove in order to get inside the remote after removing the batteries. On the other hand, it’s more likely that your remote has a case that snaps together. Some remotes fuse or glue together. It’s tougher to open fused plastic remotes without damaging them. And, you will need to figure out a way to hold it back together once repaired, such as glue.
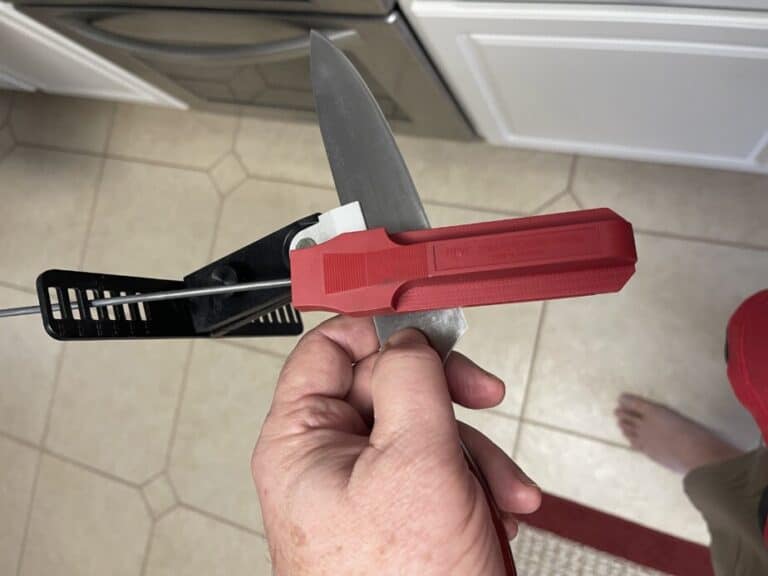
Regardless of the type of enclosure, you need to devise a way to get the case halves apart in order to fix the buttons. Non-marring plastic tools used to open smartphone cases and laptop assemblies are very useful. I have recently learned to use old credit cards, putty knives, or a 5-in-one painter’s tool to work into the seams around the case until I can finally separate the two. In more extreme cases, I may tap the putty knife into the seam with light hammer taps or pull out the Dremel tool. At some point, if you break into sealed plastic cases often enough, you begin to recognize the various tools and methods to use. It gets easier. Hopefully, you’ll be lucky, and it’ll be easy to disassemble your remote.
Cleaning Circuit Board Contacts
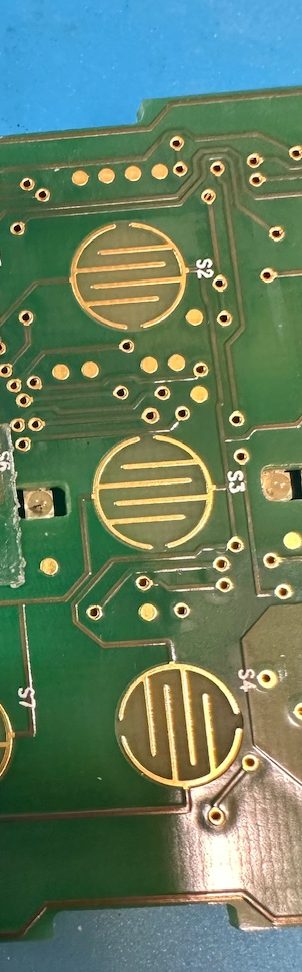
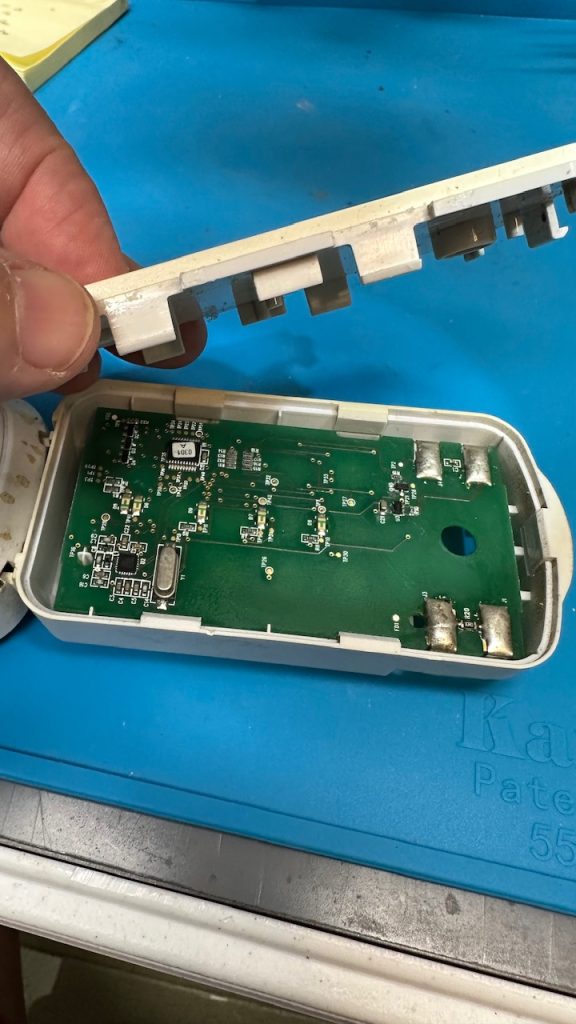
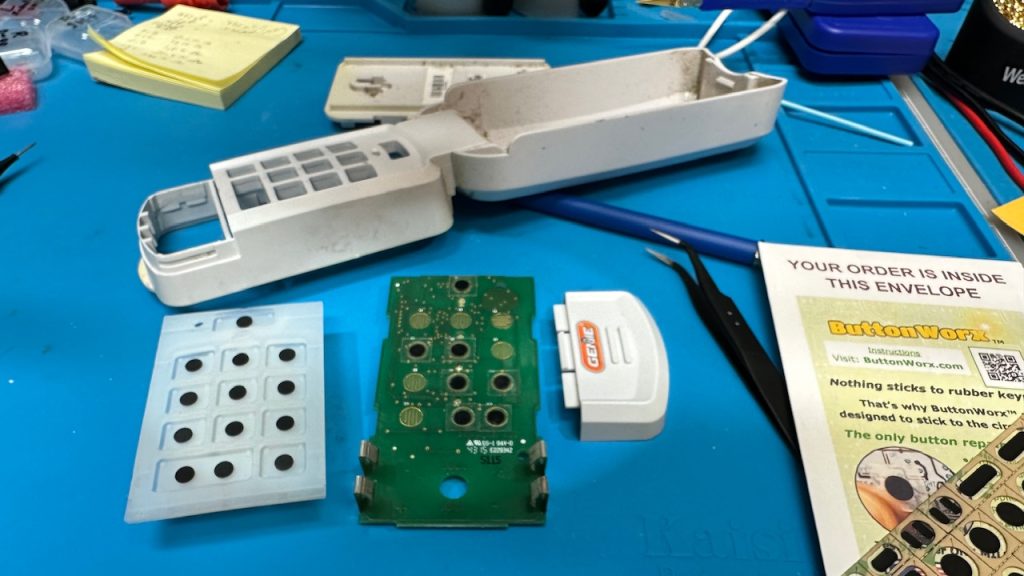
When you split open your remote, you will find at least two things inside the case: a circuit board and a squishy flexible keypad. When you look at the circuit board, you should see a bunch of electronic component stuff, possibly on one side of the board, and then you will find a matrix of circular-shaped squiggly copper traces on the opposite side. The circle-like shapes – copper traces – require careful cleaning using some isopropyl alcohol and a lint-free rag. Ideally, the copper traces on the board are shiny and corrosion-free.
If you find corrosion, possibly from leaky alkaline batteries, you must clean all of that corrosive material away. White vinegar (a mild acid) and a Q-tip will help neutralize and remove that bluish or white corrosive alkaline from anywhere you see it. You must get rid of all of it, or you’re wasting your time. Oxidation is another type of corrosion that you may encounter on the circuit board, too. An electrical contact cleaner spray is a worthwhile investment to deal with this. You can buy the good stuff online; the best is DeOxit 5, but there are other good ones, too. This stuff is pricey, but a can will last years if stored in a cool dry place. Follow the directions dutifully for amazing results. Eventually, you will find other uses for this spray; trust me on this.
Restoring The Button Pads – Two Approaches
Restoring the button pads ( those little dark spots under each flexible button ) is the final phase of getting your remote to work like new again. If you investigate your options, you will find several “solutions.” The solutions boil down to one of two approaches: the first is to use a kit to “paint” a special conductive material back on each button, or the second is to use a stick-on pad placed directly on the circuit board between each button and the respective PC board contact. The pads are peel-and-stick and come in different sizes according to your needs.
After reading many product reviews, the “paint-on” restoration approach seemed pretty hit or miss. The best paint-on solution looked to be a one-time use, multistep, industrial product costing about $40.00 USD.
ButtonWorx stick-on pads
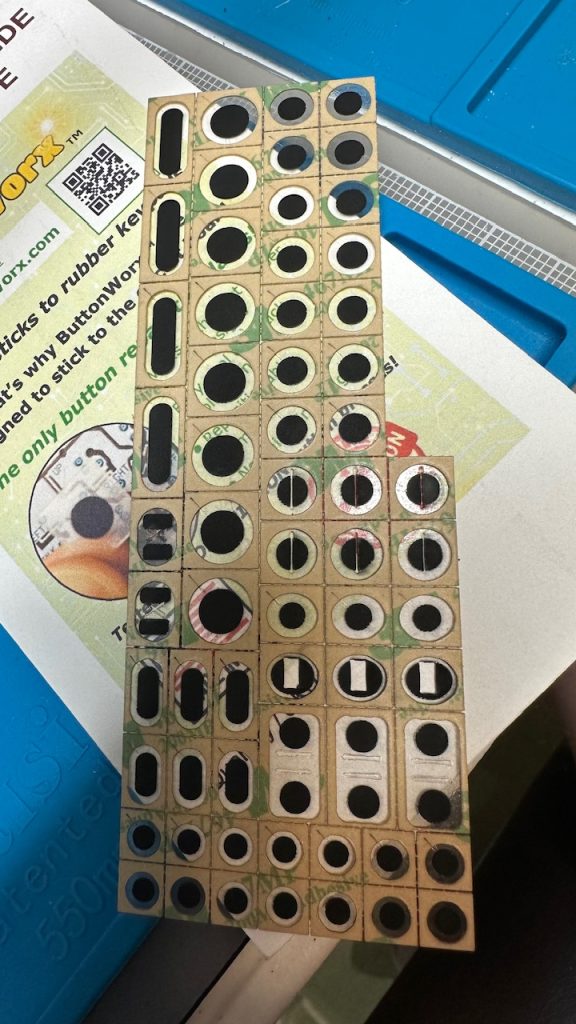
I opted for the stick-on pads from ButtonWorx for several reasons, including ease of use, durability, and effectiveness. Once the ButtonWorx product arrived, I went to work on my Genie Remote. I decided on which size I needed and used a craft knife to separate each of the pads from the large sheet I received. It took me a second to separate the brown paper from the pad and expose the adhesive. Using tweezers, I placed each pad on the circuit board. The process was completed in 10 minutes after the circuit board was cleaned. The hardest part for me was getting the paper off with my big, clumsy fingers!
Reassemble and Test
In my case, putting the remote back together was easy. After inserting the batteries, I was able to test the remote immediately. It worked flawlessly. Booyah! According to ButtonWorx, this remote should function now for many years without a problem. They use this product in their own repair business, so there’s that. The package had a nice background write-up by the inventor and owner, along with instructions for proper use. I bought the large assortment of 70+ pads so I can repair some of my other remotes, like that vintage Pioneer bugger, among others. That one will be more difficult to get into, so I’m procrastinating a little. I may just write a follow-up article on that one to demonstrate some tricks I’ve discovered for getting into sealed plastic cases without destroying them.
Anyway, that’s about it. Now you should have the knowledge you need to fix your remote control too.